
I started using MAMP PRO recently as I wanted to develop using the latest (PHP 5.4) on MacOSX and I didn’t want all the hassle of building Apache and PHP on my development machine each time…. I only found that MAMP PRO catered for PHP 5.4 much to my disappointment!
However today, I decided to give the BitNami MAMP installer a true, it has the latest version of PHP (5.4.13), Apache, PHP comes with a whole load of cool tools too such as APC support by default and one really cool thing… XDebug! – I thought I’d document the installation process for anyone else wanting to convert over to a free, open-source MAMP stack with all the support for the latest bells and whistles etc!
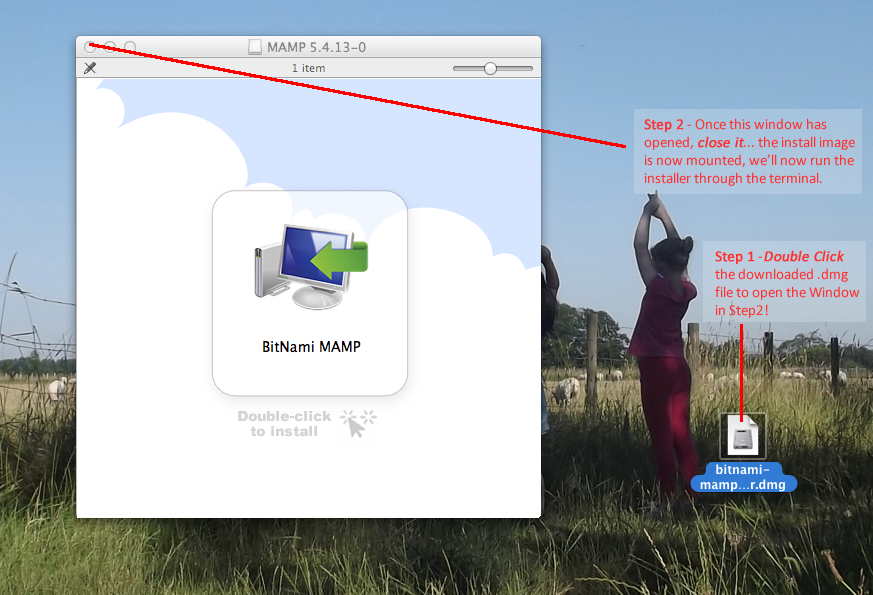
So to get started, grab the latest installer .dmg from the link at the bottom of this page, or grab it here.
Mount the install image but clicking on the downloaded .DMG file so that it loads the inital installer screen, then close the application – this is so we can install it as ‘root’ so we can run Apache normally otherwise Apache and MySQL will run on non-standard ports which just annoys me lol!
Now that you have the install image mounted, you can now use sudo to install as admin….
cd /Volumes/MAMP 5.4.13-0/
sudo ./BitNami\ MAMP.app/Contents/MacOS/installbuilder.sh
Your folder name may differ, as at the time of writing this post, I downloaded version 5.4.13-0, so obviously you may have to change the file (image) name accordingly. – If in doubt, just run:
ls /Volumes/
To display all the mounted images/volumes 🙂
So now we’ve installed it as ‘root’ we can now add it to your system startup process, on MacOSX we use launchd to achieve this…
Download the following ZIP archieve and then extract the files to your desktop, edit them and update the installation paths if you’ve downloaded a newer version of the BitNami MAMP stack.
Next run the following command to copy them to the MacOSX Daemons folder, this will ensure that in future these services (Apache and MySQL) are automatically started at system boot:-
sudo cp ~/Desktop/*.plist /Library/LaunchDaemons/
We can now test if these work by running the following command, if all goes well your BitNami stack will now automatically boot up when you start your Mac! 🙂
launchctl load -w /Library/LaunchDaemons/com.bitnami-mamp.apache.service.plist
launchctl load -w /Library/LaunchDaemons/com.bitnami-mamp.mysql.service.plist
To find out more and download, visit the BitNami MAMP stack page here: http://bitnami.com/stack/mamp
You can also symlink the php binary so that you can use the PHP and PEAR executable from the command line by running the following commands at the terminal:-
sudo ln -s /Applications/mampstack-5.4.13-0/php/bin/php /usr/bin/php
sudo ln -s /Applications/mampstack-5.4.13-0/php/bin/pear /usr/bin/pear
sudo ln -s /Applications/mampstack-5.4.13-0/php/bin/pecl /usr/bin/pecl
Hope you found this post useful, the best thing about the BitNami stack is that it also combine XDebug as well as a load of really cool other tools, perfect for Debugging your PHP application with NetBeans etc 🙂