
I recently purchased a new Apple Mac Mini M1 that I have been using for development these last few weeks and it has been fantastic but as someone who uses Docker a lot for building and shipping container images, whilst the M1 Macs will build Docker images for the M1/Apple silicon architecture (aarch64) they won’t for the generic Intel/AMD 64bit (x86_64) platform as we simply aren’t running that processor in our shiny new Apple Silicon-based Macs.
Whist the above isn’t too much of a big deal for developers using tools like docker-compose for local use, when we/they need to build and test images that will be deployed to enterprise-standard x86_64 based servers we need a way to build for that platform too.
My solution is, and whilst I can appreciate that not everyone has access to a remote Linux server using Intel/AMD processors, you can easily spin them up on your cloud infrastructure of choice but personally, I use my own virtual machine infrastructure at home which works perfectly – I have set up a Ubuntu 20.04 server with 4GB of RAM and have installed Docker on it.
So anyway, essentially we can instruct our M1 based machines to use a remote Docker host (server) through an SSH tunnel giving us the ability to run, build, test and push Intel/AMD compatible images from the comfort of our MacOS terminal.
To do this we simply need to have Docker setup on our remote server and then, when we want to “work” on an x86_64 docker environment we just need to export an environment variable in our terminal which will then hand-off (redirect) our docker commands to the remote host where our images can be built. tested and pushed from.
I will assume that you’ve already set up Docker on your remote server and added your user account to the “docker” group (so you can interact with the docker-engine without having to sudo or become root).
Let’s get started on setting this up (it won’t take longer than 10 minutes!)
Configuring SSH keys
We will generate a new SSH key pair, we can then copy the public key to our remote server (adding it to the /home/{username}/.ssh/authorized_keys file) which will allow us to automatically connect to it remotely without having to interactively enter passwords etc.
On your Mac, open up the terminal and run the following command:
ssh-keygen -t rsa -b 4096 -C "{username}@{servername}" -f $HOME/.ssh/remotedocker_id_rsaReplace all occurrences of {username} with your remote server username and {servername} with either your remote server’s IP address or hostname throughout this blog post’s command examples.
The above command will now create an SSH key pair, you can decide if you want to enter a passphrase or not!
Copying our public key to the remote docker server.
We can now enable key-based authentication access to our remote server by copying the public key that we generated in the last step, to do this, run the following command:
ssh-copy-id -i $HOME/.ssh/remotedocker_id_rsa {username}@{servername}If all went as expected you see a message stating that a total of 1 keys have been added.
Tell MacOS (ssh client) which key to use for this host.
To keep things simple (we don’t want to have to add a whole load of CLI arguments to specify a custom private key file to use when we connect to this server), lets now add a host configuration to our SSH client configuration file on our Mac…
Firstly, let’s check that this file exists on our Mac:
cat ~/.ssh/config
If you got an error complaining that the file doesn’t exist, simply run:
touch ~/.ssh/config
Let’s now open the file (nano ~/.ssh/config) add the following content (configuration) to this file:
Host {servername}
    UseKeychain yes
    AddKeysToAgent yes
    IdentityFile ~/.ssh/remotedocker_id_rsa
    User {username}
    Port 22
We can now attempt to SSH to the server using our terminal, lets try running:
ssh {servername}
You should now be connected to your remote Docker server over SSH!
You can now exit the remote session by typing exit (then press enter).
Testing it all out
Now that everything is setup all we need to do now is instruct our local Docker CLI tool to run the commands remotely on our server, to do this we just need to export an environment variable like so:
export DOCKER_HOST=ssh://{servername}
Once we are finished using the remote server (for building images, testing containers etc) you can easily “switch back” to running Docker commands locally by resetting the contents of the environment variable like so:
export DOCKER_HOST=
Alternatively, you can use the
unset DOCKER_HOSTcommand and it’ll do the same thing!
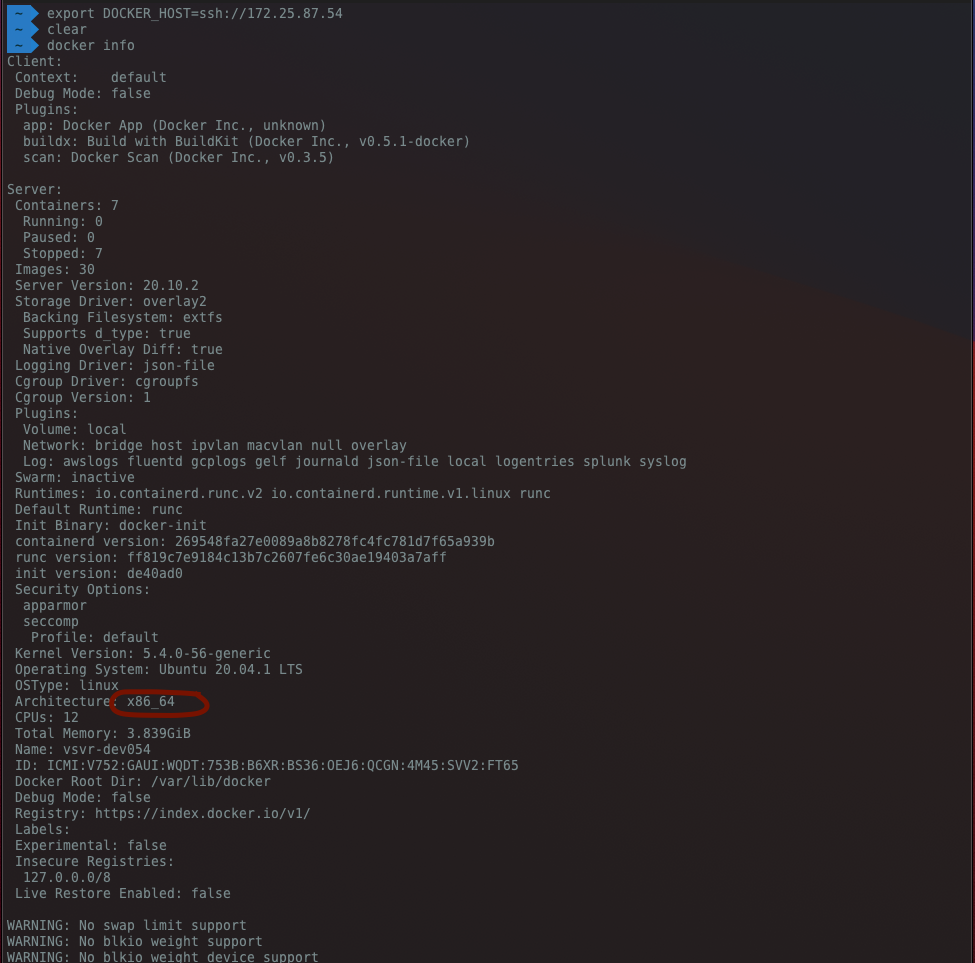
Lets now check the output and confirm that our docker commands are running on the remote docker host (server), run these two commands:
export DOCKER_HOST=ssh://{servername}
docker info
As you can see from my screenshot below, we are now running commands remotely on our remote Docker instance which is installed on our Linux server this means that we can now build, run and test images on the x86_64 architecture!
If we now clear/unset the DOCKER_HOST environment variable, re-running the command then shows our Docker info for our local instance (running on our M1 Mac):
export DOCKER_HOST=
docker info

Wrapping up
In my opinion, this is simply fantastic and with some creativity (aka a bash script maybe ;)) we can easily script and execute build tasks that will first build and push images to our registry from our M1 mac (for aarch64 images), then set the environment variable (effectively switching to the remote Docker host) and have that build and push x86_64 compatible images to our registry too, fully automated!
You could, of course, use a hosted CI/CD service that supports building container images for multiple architectures to accomplish the same thing if you wanted though but as you might expect that would come with all the associated cost and rate limits!
If you feel that you will be using these commands a lot, you may want to consider adding a couple of aliases to your terminal, for example, I’ve added these two aliases:
alias dhr='export DOCKER_HOST="ssh://{servername}" && echo "Docker host set to use remote server"'
alias dhl='export DOCKER_HOST="" && echo "Docker host set to localhost!"'
So now, when I want to use the remote server (for working with x86_64 builds) I just run dhr (Docker Host Remote) in the terminal and to switch back to use my local machine for builds etc. I can use dhl (Docker Host Local) in the same way!
As a quick FYI before I go – when we run a docker build command remotely, the context (all files and directories that live in the same directory as your Dockerfile) are sent over to the remote server so just keep in mind that this won’t be as fast initially as it needs to complete a file copy of the contents first).
Docker can also be installed on a Raspberry Pi too, so you can also set up your own remote docker host on a Raspberry Pi and build generic ARM images too if you wanted.
I hope this blog post was of some help and until next time, stay safe people!