
The “cloud” is great and there are now several cloud providers offering managed Kubernetes clusters such as Amazon’s Elastic Kubernetes Service (EKS), Google’s Kubernetes Engine (GKE) and Microsoft Azure’s Kubernetes Service (AKS) but sometimes people like to host and play with their own stuff, on their own hardware – right?!
Personally, I use several cloud services but I also like to understand how the underlying technology works – I have a bare metal K8s cluster (on a number of VM’s) at home, this enables me to play and fine-tune my containers and YAML files etc. before I push to cloud services (and start having to pay real money)
I thought I’d document the process of setting up a Kubernetes cluster on several virtual machines (obviously the same applies to true bare metal too) but here goes…
The requirements
I will create three virtual machines all of which are running Ubuntu Server 18.04 (we can add more at a later date if we wanted), the specs and the IP addresses that I will use are as follows:
- VSVR-KBX070 (Kubernetes Master) – 172.25.87.70
- VSVR-KBN071 (Kubernetes Node #1) – 172.25.87.71
- VSVR-KBN072 (Kubernetes Node #2) – 172.25.87.72
The master server will be configured with 2GB of RAM and 2 vCPU’s
Both node servers will be configured with 1GB of RAM and 1 vCPU’s
The above hardware configurations are the minimum recommended in the Kubernetes documentation for each server type, you can, of course, add more RAM and vCPU’s if you wanted!
Installing the base software
These instructions should be executed on ALL servers
Let’s start off as we would normally do on a fresh server, let’s update our package repository lists and apply any upgrades that are waiting for us:
sudo apt-get update -y
sudo apt-get upgrade -y
Kubernetes recommends setting net.ipv4.ip_forward is to 1 we will, therefore, need to apply this change as follows:-
sudo sysctl -w net.ipv4.ip_forward=1
sudo sed -i 's/#net.ipv4.ip_forward=1/net.ipv4.ip_forward=1/g' /etc/sysctl.conf
sudo sysctl -p /etc/sysctl.conf
In order for Kubelet to work correctly, we also need to disable SWAP, we can do this by running the following commands:
sudo swapoff -a
sudo sed -i '2s/^/#/' /etc/fstab
For the majority of users, the above sed command should work if you accepted the default partition map in Ubuntu Server installation but you should check that it’s disabled the correct line by running
cat /etc/fstab, all being well, the ‘/swap‘ partition will be commented out (the line will pre prefixed with hash “#“).
We will now install a few dependencies before we move on to install the Docker engine…
sudo apt-get install apt-transport-https ca-certificates curl software-properties-common -y
We can now import the Docker repository GPG key and add the Docker repository and install it like so:
curl -fsSL https://download.docker.com/linux/ubuntu/gpg | sudo apt-key add -
sudo add-apt-repository "deb [arch=amd64] https://download.docker.com/linux/ubuntu $(lsb_release -cs) stable"
Looking good!
Let’s update our package list and then install Docker from the official repository like so:
sudo apt update
sudo apt-get install docker-ce -y
Now that Docker is installed, we’ll add our user to the Docker group to ensure that we can run commands without getting permission issues.
sudo usermod -aG docker $USER
Now we will install some more packages, these are various Kubernetes software components.
Like we did before, we will now import a Google GPG key (Kubernetes is a Google project!)
curl -s https://packages.cloud.google.com/apt/doc/apt-key.gpg | sudo apt-key add -
sudo apt-add-repository "deb http://apt.kubernetes.io/ kubernetes-xenial main"
…and now we will install the other components (making up the Kubernetes software stack):
sudo apt-get update
sudo apt-get install kubernetes-cni -y
sudo apt-get install kubelet kubeadm kubectl -y
We will now mark these packages as ‘held’ to ensure continuity in our platform – you will, however, need to manually manage updates in future though!
sudo apt-mark hold kubernetes-cni kubelet kubeadm kubectl docker-ce
In future, when you want or need to update your packages you must “unhold” these packages by running:
sudo apt-mark unhold kubernetes-cni kubelet kubeadm kubectl docker-cethen proceed to update your packages, you must, however, ensure that you update all of your servers as Kubernetes requires the same versions of the software on all servers (master and nodes).
Now that we have the Kubernetes components installed we will restart our kubelet service like so:
sudo systemctl daemon-reload
sudo systemctl restart kubelet
We will now download and set a default audit policy (see Audit API types for more details), run the following commands:
sudo mkdir -p /etc/kubernetes
We will download a template (basically setting the default audit level to “Metadata” which seems a sane default) and set it as follows:
wget https://blog.bobbyallen.me/wp-content/uploads/2020/02/audit-policy.txt && sudo mv audit-policy.txt /etc/kubernetes/audit-policy.yaml
sudo chown root:root /etc/kubernetes/audit-policy.yaml
sudo chmod 0600 /etc/kubernetes/audit-policy.yaml
We’ll also need to create a directory to store our Audit logs, we can do this like so:
sudo mkdir -p /var/log/kubernetes/audit
Next and although not really required at the moment, we’ll finally install the NFS client on our servers, this will come in handy later when you want to use persistent storage and is worth setting up at this point (as it’s so quick and simple), let’s run the following:
sudo apt-get install nfs-common -y
Let’s now reboot all of our servers (to ensure confidence that all services etc have started as we expect) and then we will move on to the server-specific configurations…
sudo reboot
Configuring our Master Server
All of the commands in this section should ONLY be run on our master server (VSVR-KBX070).
Let’s now initialise our cluster on our master server (ensure to replace the master server address in the command below with your own!)…
sudo kubeadm init --pod-network-cidr=192.168.0.0/16 --apiserver-advertise-address=172.25.87.70
It will now take a few minutes for this process to complete, just hold tight until you see this output…

Be sure you copy and keep the “kubeadm join” command which contains a token as highlighted in the above screenshot as we’ll need to use this on our node servers shortly.
Next, we need to run a few other commands before we can start using the cluster, run these commands:
mkdir -p $HOME/.kube
sudo cp -i /etc/kubernetes/admin.conf $HOME/.kube/config
sudo chown $(id -u):$(id -g) $HOME/.kube/config
Having run the above commands we should now be able to execute this command:
kubectl get pods -A
…and see a list of Kubernetes system pods:
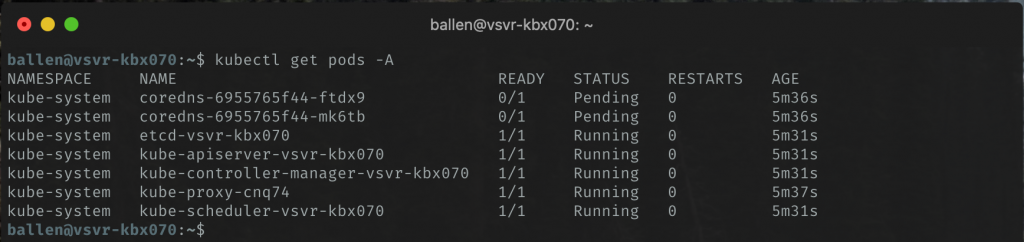
The above screenshot shows that the status of the coredns pods are currently in the Pending state, these will remain like this until we’ve installed a network provider.
Next, we now need to install a Pod network plugin, we will use Calico for this, let’s download the configuration:
wget https://docs.projectcalico.org/v3.17/manifests/calico.yaml
…and then we can install it like so:
kubectl apply -f calico.yaml
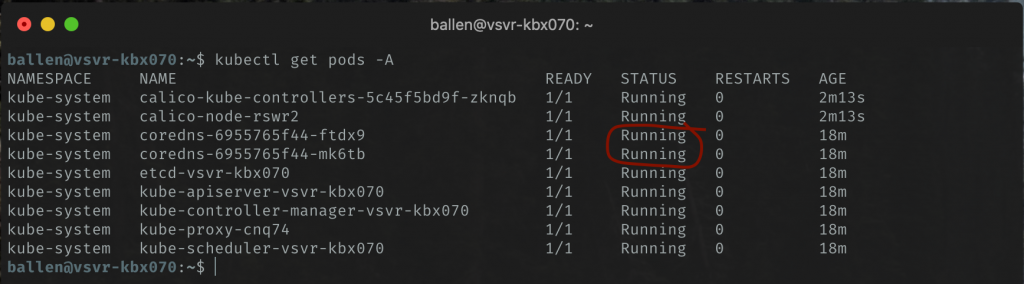
If we now re-run the get pods command, after a few minutes, our coredns pod statuses should be running:
Now that we have Calico working, let’s now install MetalLB; MetalLB will provide us with a mechanism of configuring a static IP address range that our cluster will dish out to load balancer services that we set up on our bare metal cluster and will enable external access to applications on our cluster.
kubectl apply -f https://raw.githubusercontent.com/metallb/metallb/v0.9.5/manifests/namespace.yaml
kubectl apply -f https://raw.githubusercontent.com/metallb/metallb/v0.9.5/manifests/metallb.yaml
We will now add a configuration file and update it with a range of IP addresses from our LAN IP range – this will enable all computers on our LAN to be able to access applications that are hosted on our cluster through a LoadBalancer service.
Download this example metallb-config.yaml file:
wget https://blog.bobbyallen.me/wp-content/uploads/2020/02/metallb-config.txt && mv metallb-config.txt metallb-config.yaml
Now open the file…
vi metallb-config.yaml
Update the addresses range, the LAN addresses that I’ve chosen are: 172.25.87.240-172.25.87.250 but I would almost certainly assume that you will be changing yours to a more common subnet (mine is pretty non-standard due to a number of VPN routing requirements I have at home)… your range would probably be something like 192.168.1.200-192.168.1.240.
Make sure that your range does not collide with any DHCP address ranges or other statically set IP addresses in your network!
Once you’ve saved the changes to the metallb-config.yaml file, we can apply it like so:
kubectl apply -f metallb-config.yaml
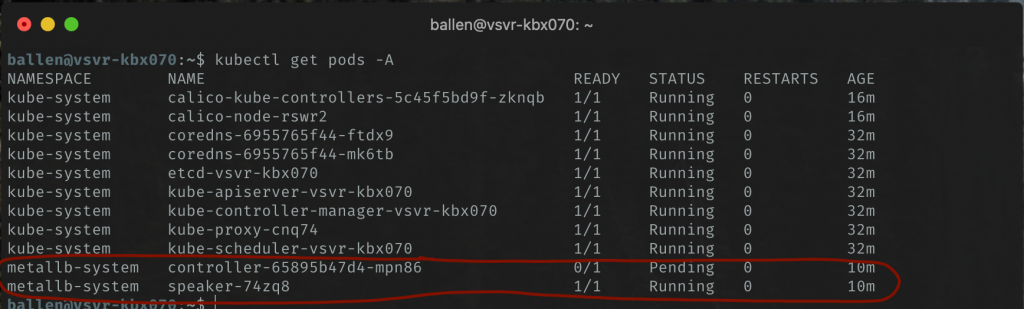
The output of running kubectl get pods -A again will show that we have two new (metallb related) pods:
You may find that speaker-XXXX line is showing a status of “CreateContainerConfigError” and if so, you should be able to fix by running this command:
kubectl create secret generic -n metallb-system memberlist --from-literal=secretkey="$(openssl rand -base64 128)"Once ran, reboot your server and re-check the status using
kubectl get pods -A, it should now show as running !
Configuring and joining our Nodes to the Cluster
All of the commands in the section should ONLY be run on our Nodes (VSVR-KBN071, VSVR-KBN072 etc.)
We should simply be able to join the cluster like by pasting in the join command that we had been shown when we initiated our cluster earlier.
Run the command (your tokens and IP addresses will differ to my example below) on each of your Node server like so:
sudo kubeadm join 172.25.87.70:6443 --token hjnt72.ku3ozm905ocqag7y \
    --discovery-token-ca-cert-hash sha256:18a6e985269123b891d6117af3bf4356cec7b140680ea118b98ce72b68ad157d
That’s it! – That’s all that is required to be run on the Node servers.
Testing it
Let’s now test it out by deploying some pods and setting up a load-balancer.
All of these commands should be run from our master server (VSVR-KBX070) – you should not need to login to any of the nodes now as the master will control them remotely.
Let’s check the current status of our nodes, running the following command should show (after a few minutes) that each of our nodes (servers) as Ready.
kubectl get nodes
The output shows as follows:

Let’s now check the status of all of our metallb pods…
kubectl get pods -n metallb-system -o wide
The output shows that we have the controller pod current running on vsvr-kbn01 and a speaker pod deployed on all nodes and the master server.

Ok, that all looks healthy.
Now, and for the final test… let’s deploy a demo application (from my public Docker Hub registry), a load-balancer service and attempt to scale the instances:
kubectl create deployment jenkkube --image=allebb/jenkkube-demo:latest --port=8000
Now we have deployed an instance of the application, lets now create a LoadBalancer service like so:
kubectl expose deployment jenkkube --type=LoadBalancer --port=80 --target-port=8000 --name jenkkube-loadbalancer
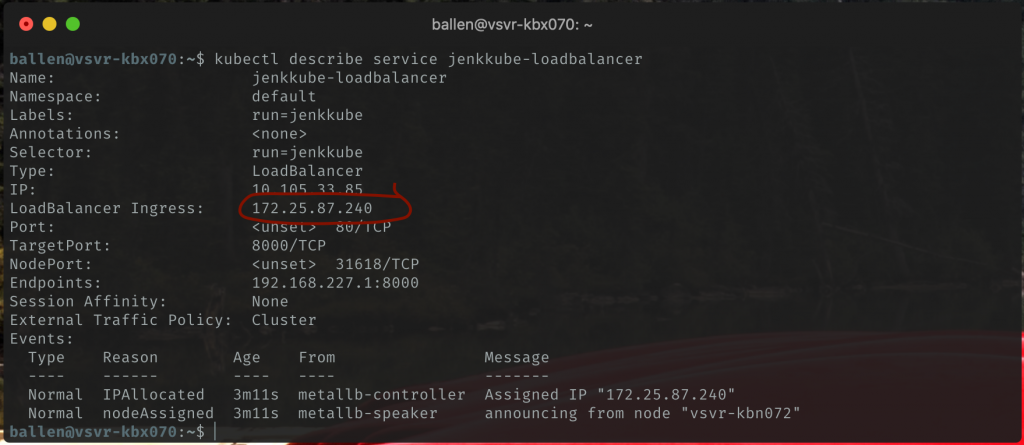
Let’s find out what our assigned load-balancer IP address (all going to plan this will be the first IP address from your range that you configured in the metallb-config.yaml file earlier) is by running:
kubectl describe service jenkkube-loadbalancer
We can also use this command to get the external IP too if you wanted:
kubectl get services -o wide

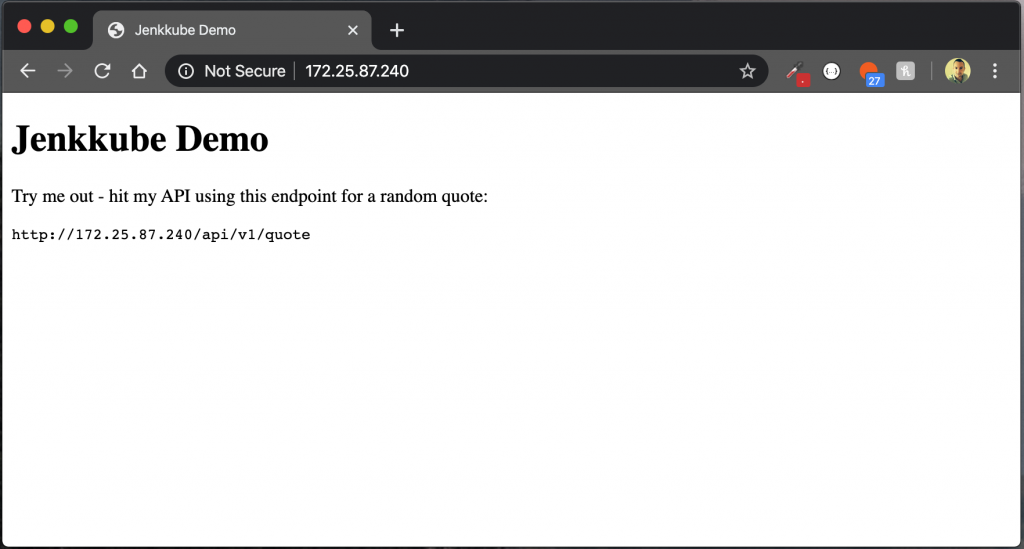
Now, opening a browser on a machine on your LAN, try accessing the demo application like so:
http://{load-balancer-ip-address}/
Now for the cool part… let’s scale this application “horizontally” (to to 8 instances) by running:
kubectl scale --replicas 8 deployment/jenkkube
You can also, very easily scale back the number of replica pods by simply re-running the command with the number of replica’s eg. we can scale it back to a single instance by simply running
kubectl scale --replicas 1 deployment/jenkkube.
We can check the state of the replica pods and where (on what node) they are running by executing this command:
kubectl get pods -o wide
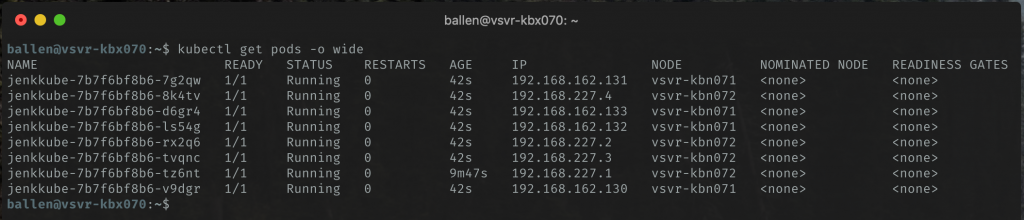
Now, each time you refresh your browser you are getting bounced between application instances (pods) which are spread over different nodes (servers).
Want to see proof that we’re getting load-balanced behind the scenes? – as part of the demo application that we deployed, I added a response header to an application API endpoint. We can, therefore, use cURL and grep to very easily prove that we are hitting random instances (pods) each time we make a request…
curl -sD - -o /dev/null http://172.25.87.240/api/v1/quote | grep X-Handled-By
The above cURL command makes the request, ignores the actual page content (by sending the output to /dev/null) but will output the value of the X-Handled-By response header of the pod that handled the request, which I’ve set to use the instance hostname…

If you want to clean up your cluster by removing the demo application and our load-balancer service you can run the following commands:
kubectl delete deployment jenkkube
kubectl delete services jenkkube-loadbalancer
If you want to add additional nodes to your cluster at a later date, given that the initial kubeadm join command token is only valid for 24 hours, you would need to generate a new one on your master server by running:
kubeadm token create --print-join-commandYou will get the following output (use this command on your new nodes to add them to the cluster)…
kubeadm join 172.25.87.70:6443 –token mm86yg.1j6k2qzl5rdiw7so –discovery-token-ca-cert-hash sha256:9a3c138a00c27e9a26a22f6b8bd3eef126ca24af452308040ed3d3f1ad11384d
Managing your cluster from your workstation
So far, we’ve deployed and interacted with our Cluster through our Master (VSVR-KBX070), you can also execute commands from your workstation simply by copying down the admin.conf file.
First of all, ensure that you have the kubectl command line tool installed on your machine, on Ubuntu 20.04 desktop you can install this like so:
snap install kubectl
Lets’ now copy our remote master configuration to our local machine/workstation (run these commands from your workstation):
# Create a kube directory (if it doesn't already exist)
mkdir ~/.kube
# Now copy our cluster configuration file to our local machine.
scp {username}@{master-server}:/home/{username}/.kube/config ~/.kube/my-cluster
The above command will copy the configuration file to our local machine and will then enable you to run commands against your cluster by specifying the cluster configuration file like so:
kubectl --kubeconfig='.kube/my-cluster' get pods
Instead of having to specify the –kubeconfig file path each time, you can instead create a shell alias (this is what I’ve done), when you execute the shell alias, in my case “
ksc:my-cluster“, this will automatically set the KUBECONFIG environment variable which will then be used by thekubectlcommand each time you use it.The alias that I have added to my .zshrc file (if you use BASH, you should add this to your .bash_profile instead) is as follows:
alias ksc:my-cluster='export KUBECONFIG="${HOME}/.kube/my-cluster" && echo "Kubernetes cluster set to 'my-cluster'!"‘You can, of course, add another alias to set your cluster back to the default localhost (say, if you’re using MiniKube on your workstation too:
alias ksc:local='export KUBECONFIG="" && echo "Kubernetes cluster set to 'localhost'!"'
As you would expect, the other commands all work too such as remoting (SSH’ing) into a running pod:
# Example of running BASH interactively in a pod:
kubectl --kubeconfig='.kube/my-cluster' exec -it jenkkube-7b7f6bf8b6-bv2rc -- /bin/bash
# Want to just output the contents of a log file from a running pod? - This would work too...
kubectl --kubeconfig='.kube/my-cluster' exec jenkkube-7b7f6bf8b6-bv2rc cat /var/log/bootstrap.log
If you wanted to use your new bare-metal Kubernetes cluster as your default and have all of your
kubectlcommands that you issue from your your workstation execute against your new cluster, you could use it to be the default configuration (by simply copying the remote config file to ~/.kube/config instead – you then wouldn’t need to pass in the –kubeconfig=” argument with every command or set up an environment variable switching alias.
So, up until this point, we have used the kubectl CLI tool to explore our cluster but you can also install a GUI dashboard too – this comes in handy to check the health of your cluster as well as quickly and easily view logs etc. Let’s install this now…
From your terminal run the following command:
kubectl --kubeconfig='.kube/my-cluster' apply -f https://raw.githubusercontent.com/kubernetes/dashboard/v2.0.0/aio/deploy/recommended.yaml
Great – that’s the dashboard is now installed!
Before we can access it though, we have a couple more things that we must do, firstly we need to obtain a token (we will need this in order to login to the dashboard), so first we should create a new service account and cluster role using these commands:
kubectl --kubeconfig='.kube/my-cluster' create serviceaccount dashboard-admin-sa
kubectl --kubeconfig='.kube/my-cluster' create clusterrole dashboard-admin-sa --clusterrole=cluster-admin --serviceaccount=default:dashboard-admin-sa
Now that we have created the service account and bound it to a cluster role we can now retrieve the secret name for our token that was generated above:
kubectl --kubeconfig='.kube/my-cluster' get secrets
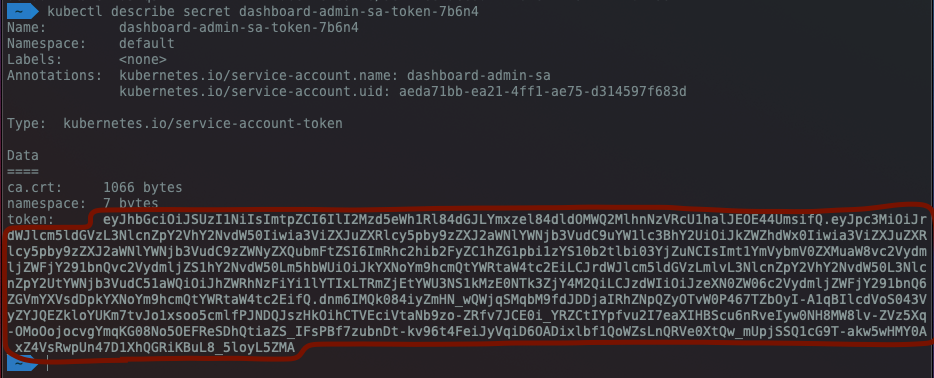
We should now be able to see a list of the secrets, copy the secret name that matches “dashboard-admin-sa-token-XXXXXX” as demonstrated here:

We now need to use this secret name in order to obtain our token string (essentially our login credentials for the dashboard), with the secret name copied to your clipboard, run the following command (remember to replace your secret name with the one I’ve used in my example below):
kubectl --kubeconfig='.kube/my-cluster' describe secret dashboard-admin-sa-token-XXXXX
Now copy the token string as shown in my screenshot below, at this point I would recommend storing it in a password safe (such as KeePassXC or Dashlane etc).
So now that we have our token, it’s time for us to login to our Kubernetes dashboard. In order for us to access the Kubernetes dashboard from our workstation, we must run a local proxy, we can do this by running this command:
kubectl --kubeconfig='.kube/my-cluster' proxy
You’ll notice that your terminal window will now start the local proxy process as demonstrated here:
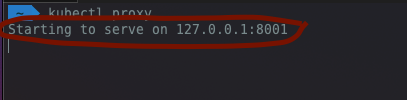
….minimise your terminal (this process must remain running though so don’t kill the process or exit your terminal) and open up a web browser navigate to:
Yeah, I hear you, it’s a monster of a URL but create a bookmark on your browser or shortcut on your desktop and you’ll be fine 😉
We should now be presented with the dashboard login screen:
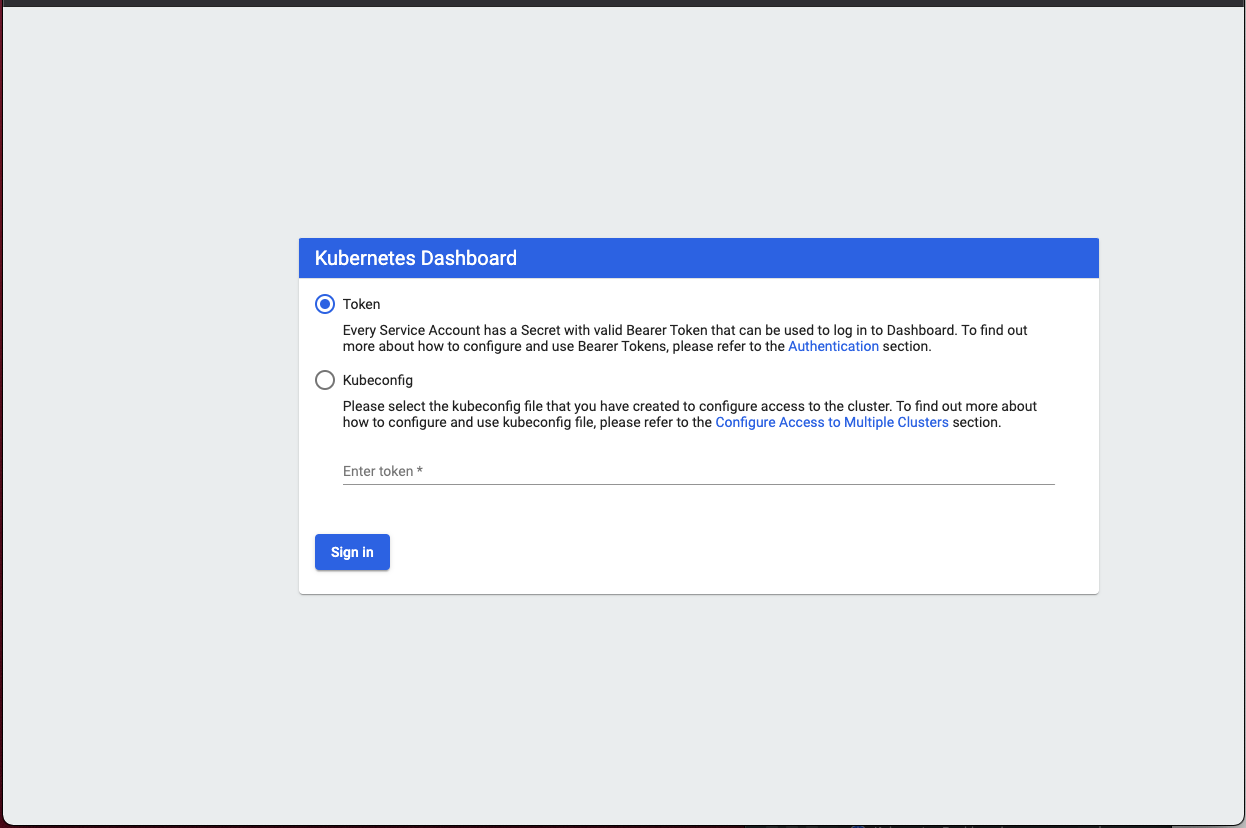
Ensure that the Token radio button is selected and now paste your token into the Enter token* field and then click that Sign In button.
If all went as expected, you should now be logged in to your Kubernetes Dashboard like so:
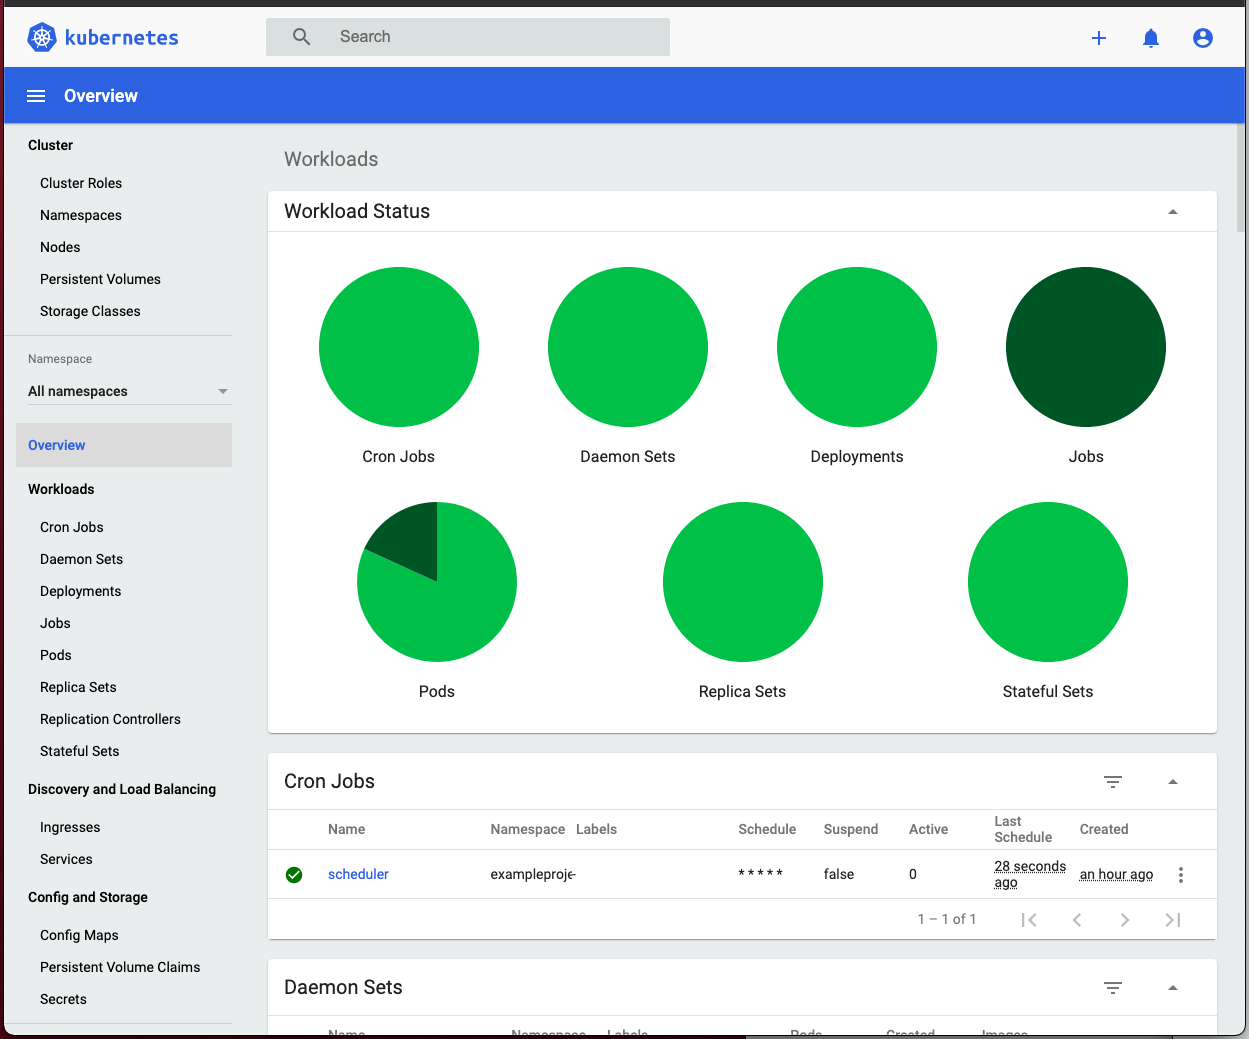
Congratulations, we’re done!
Well, that’s it for this one, your cluster is now set up and working – you’re now ready to explore and experiment with Kubernetes further!