
Composer is fast becoming the de facto standard for managing packages and dependencies in PHP applications. Composer is like Bundler, a dependency manager for Ruby on Rails! In this post, I’ll be showing you how you can configure your own application to use Composer’s features and how to automatically install and update your own packages from GitHub.
In the past I’ve worked with and used Bundler of which I thought was really awesome, In PHP I write a lot of my own libraries and packages and as Composer, like I said above is being more widely used its worth making sure your packages etc. are Composer compatible meaning you can write your own classes, packages and libraries then host them on GitHub and re-use them over and over again in your applications!
So this is meant as a rapid overview on how to get and use custom GitHub packages instead of using Packagist-published PHP modules. If you want more information on Composer, there is a whole load of documentation on the Composer website.
Ok, so let’s get going…
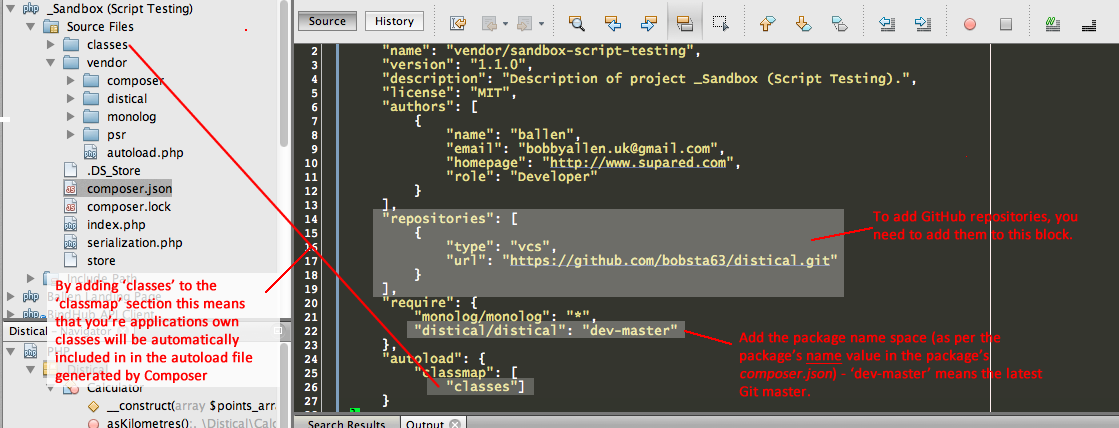
Basically to make your application ‘Composer’ ready simply create a new composer.json file in the root of your web application.
The following screenshot demonstrates the general configuration for the composer.json file.
Once you have your new composer.json file configured for your application you can then run the following command to install the specified packages like so:-
composer install
You may also find this command useful in future, this re-generates the autoloaders and their configuration files (these know about what packages are installed and what files/paths to attempt to load your PHP files from.)
composer dump-autoload
In future, you can automatically update your package/dependencies but running this command (unless your application’s composer.json file is configured to use a specific version of a package.):-
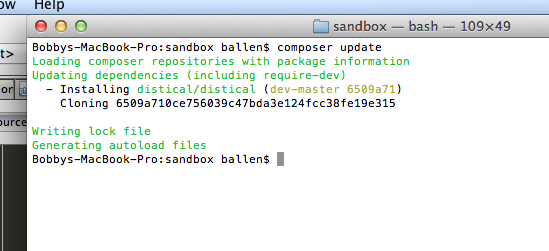
composer update
You should see a screen like this, this will show you all the packages that Composer is downloading and ‘installing’ for you inside the ‘vendor/‘ folder, the ‘vendor/‘ folder is created automatically by Composer!
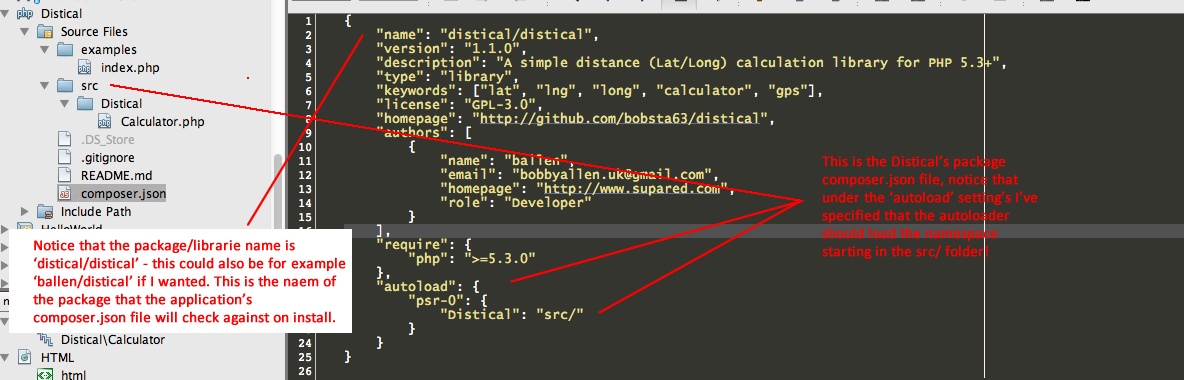
To ensure that the auto-class loading works correctly it’s a good idea that the package/library is compatible with the PSR-0 Autoloading Standards guidelines over at PHP-FIG.
It’s important to note here that Composer makes use of PHP namespaces, you’ll notice that the folder structure as shown in the below screenshot firstly uses the package namespace, in this case ‘distical/distical’ and creates these two folders under the ‘vendor’ folder of which is automatically created by Composer when you first run composer install on your application. Next as the package’s (Distical’s) composer.json file is configured to use the src/ folder, it then loads the folder paths as per the PHP namespaces declared in the package/library (PHP classes) files.
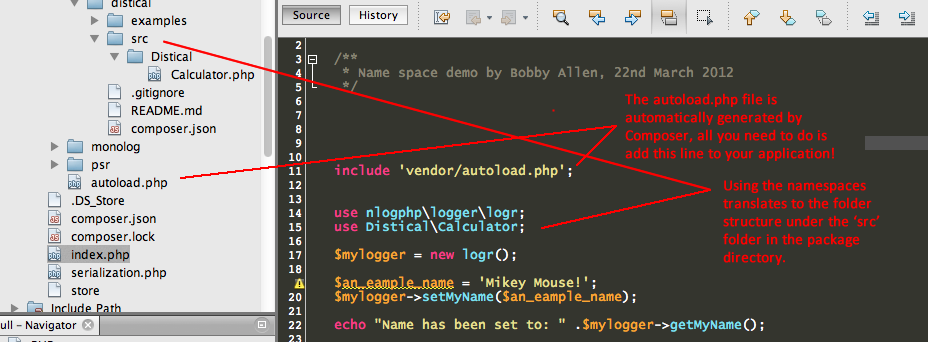
So the next thing to do is to add a line of code to your PHP application, this is as follows:-
require 'vendor/autoload.php';
Your application will now automatically ‘include’ and load your PHP classes from your installed packages and any other application-specific include paths (if you’ve configured these paths in the classmap settings).
Feel free to copy and paste the below example composer.json file and edit it to your requirements.
{
 "authors": [
 {
 "name": "ballen",
 "email": "bobbyallen.uk@gmail.com",
 "homepage": "http://www.supared.com",
 "role": "Developer"
 }
 ],
 "repositories": [
 {
 "type": "vcs",
 "url": "https://github.com/allebb87/distical.git"
 }
 ],
 "require": {
 "monolog/monolog": "*",
 "distical/distical": "dev-master"
 },
 "autoload": {
 "classmap": [
 "classes"
]
 }
}
It’s good to note here that if you’re making your own packages, in the above example ‘distical/distical‘ refers to the ‘name‘ value in the composer.json file in the package’s config file… The below screenshot tries to demonstrate this:-
I hope you found this useful, It is rather hard trying to give a quick overview without potentially confusing things but I hope this served as primer to get you started and hopefully at least make it a little simpler to understand 🙂
One reply on “Using Composer in your own PHP projects with your own Git packages/libraries”
[…] http://blog.bobbyallen.me/2013/03/23/using-composer-in-your-own-php-projects-with-your-own-git-packa… […]