
Mailcatcher is an awesome tool for capturing emails generated and sent from your application.
I’m an avid Laravel fan and recently Laravel released Homestead, Homestead is a pre-configured vagrant box for developing Laravel applications.
Previously I had been using Vaprobash for each of my Laravel applications of which had MailCatcher support out of the box of which I loved and now miss (as I’m now using Homestead for new projects). – I’m still using Vaprobash for other non-Laravel projects that I’m working on and I’d definitely recommend it to others!
This quick forum post is going to demonstrate the steps that you need to follow in order to get Mailcatcher installed on your Homestead box.
So before you start make sure that your Homestead Vagrant instance is not running, we need to add a new port forwarding rule to enable us to access the MailCatcher web interface, so lets do this by editing the file named homestead.rb of which exists in your homestead/scripts/ directory (the directory which you cloned as part of the Homestead installation process)
If you’ve installed Homestead2, using the Composer global include method, you will be able to find the homestead.rb file here instead: ~/.composer/vendor/laravel/homestead/scripts.
Add the following port forwading configuration below the existing one, the rule you will need to add is as follows:-
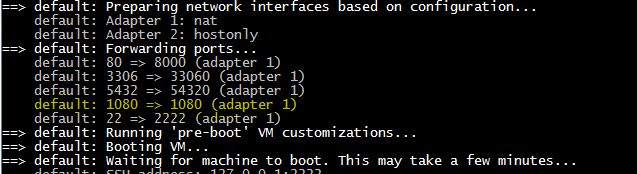
config.vm.network "forwarded_port", guest: 1080, host: 1080
Now you’ve added the port forwarding configuration, save the file and start up the Homestead vagrant instance like so:
vagrant up
Once your Vagrant box is fully started you should notice that the new port forwarding rule is in affect by checking the following:
Next we need to install some dependencies and then install MailCatcher (at the time of writing the version of the Homestead vagrant box is v.0.2.0)
Login to the Vagrant server using this command:
vagrant ssh
Now run the following commands:
sudo apt-get update
sudo apt-get install ruby1.9.1-dev
sudo gem install mailcatcher
Now we need to create an Upstart service on the virtual machine, this will ensure that we don’t have to manually start MailCatcher each time we restart the Vagrant box.
So we’ll do this by creating a new file like so:
sudo nano /etc/init/mailcatcher.conf
Now add the following content and then save the file!
description "Mailcatcher"

start on runlevel [2345]
stop on runlevel [!2345]

respawn

exec /usr/bin/env $(which mailcatcher) --foreground --http-ip=0.0.0.0
At this point you can now either restart the Vagrant box by running vagrant halt && vagrant up or manually start the new MailCatcher service by running this command:
sudo service mailcatcher start
Back on your desktop machine you should now be able to access the MailCatcher web interface using:
Remember, before the web interface will show you emails that have been received you need to configure your server to send emails to it’s SMTP service of which is running on port 1025.
If you wish to have other machines/servers end emails other than just the Vagrant box you will also need to add a port forwarding rule for port 1025 also (in the same way you did for the web interface port 1080).