
Here are a few notes about how to set-up a high-availability web server farm using Ubuntu 12.04 LTS using a whole load of awesome software (HAProxy, HeartBeat, Watchdog and Nginx)
The setup
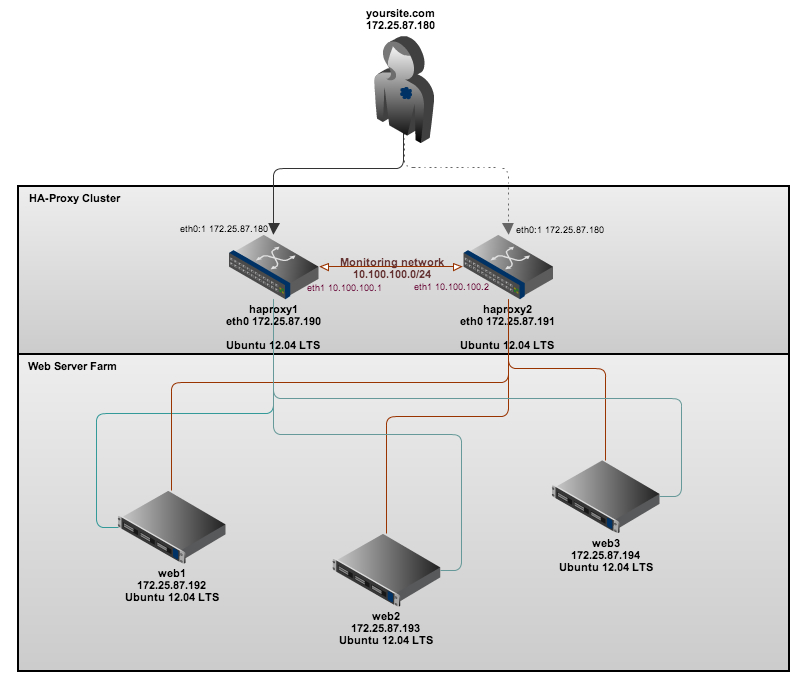
In my setup I have five virtual machines, these are named and used for the following:-
haproxy1 – Our first proxy (master)/load-balancer (running HAProxy, HeartBeat and Watchdog) [IP address: 172.25.87.190]
haproxy2 – Our second proxy (failover)/load-balancer (running HAProxy, HeartBeat and Watchdog) [IP address: 172.25.87.191]
web1 – Our first web server node (running nginx) [IP address: 172.25.87.192]
web2 – Our second web server node (running nginx) [IP address: 172.25.87.193]
web3 – Our third web server node (running nginx) [IP address: 172.25.87.194]
The servers are connected in the following way:-
In my next post I will also explain how to configure the web servers to point to a backend shared storage cluster (using NFS) and a MySQL cluster server to have a truly highly available web hosting platform.
Lets get going…
Firstly, add the following to each of your server’s /etc/hosts file (to ensure all machines can resolve each other’s hostnames)
172.25.87.180 yoursite.com #This is our 'floating' (virtual IP) for our web-cluster.
172.25.87.190 haproxy1
172.25.87.191 haproxy2
172.25.87.192 web1
172.25.87.193 web2
172.25.87.194 web3
10.100.100.1 haproxy1
10.100.100.2 haproxy2
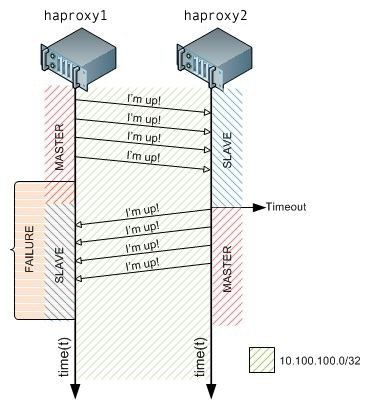 Next ensure that both of the load balancers (haproxy1 and haproxy2) have a second network card installed so we can configure a separate ‘monitoring’ network between the two load-balancers. The second network card will enable Heartbeat to constantly send ‘Im alive’ messages to one another, when the master stops responding to the fail-over load-balancer, the fail-over proxy will take over! This image on the left demonstrates how this looks.
The network configuration in /etc/network/interfaces should look as follows:
On haproxy1 (Our master load-balancer):
# This file describes the network interfaces available on your system
# and how to activate them. For more information, see interfaces(5).
# The loopback network interface
auto lo
iface lo inet loopback
# The primary network interface
auto eth0
iface eth0 inet static
 address 172.25.87.190
 netmask 255.255.255.0
 gateway 172.25.87.1
 dns-nameservers 8.8.8.8 8.8.4.4
auto eth0:1
iface eth0:1 inet static
 address 172.25.87.180
 netmask 255.255.255.0
auto eth1
iface eth1 inet static
 address 10.100.100.1
 netmask 255.255.255.0
On haproxy2 (our failover load-balancer):
# This file describes the network interfaces available on your system
# and how to activate them. For more information, see interfaces(5).
# The loopback network interface
auto lo
iface lo inet loopback
# The primary network interface
auto eth0
iface eth0 inet static
 address 172.25.87.191
 netmask 255.255.255.0
 gateway 172.25.87.1
 dns-nameservers 8.8.8.8 8.8.4.4
auto eth0:1
iface eth0:1 inet static
 address 172.25.87.180
 netmask 255.255.255.0
auto eth1
iface eth1 inet static
 address 10.100.100.2
 netmask 255.255.255.0
As you can see above, we’ve configured a virtual IP address of which both machines are able to use, to ensure that both machines can start (as normally two machines in the same network cannot have the same IP address) we need to run the following command (on both haproxy1 and haproxy2):-
echo "net.ipv4.ip_nonlocal_bind=1" >> /etc/sysctl.conf
Then confirm that the changes have been made by running (sysctl -p) (it should return ‘net.ipv4.ip_nonlocal_bind = 1‘)
Now you should be able to restart the networking service on both our HAProxy servers.
service networking restart
We now need to create a few config files, these files are for the configuration of HeartBeat, these files are the same on both the haproxy servers (haproxy1 and haproxy2) servers!
First file to create should be located in: /etc/ha.d/ha.cf
watchdog            /dev/watchdog
logfile             /var/log/ha-log
debugfile           /var/log/ha-debug
deadtime            5
warntime            10
initdead            15
bcast               eth1
auto_failback       on
node                haproxy1
node                haproxy2
Second file, to be located: /etc/ha.d/authkeys
auth 3
1 crc
2 sha1 yourpasswordhere
3 md5 yourpasswordhere
Now, change the file permissions to 600 like so:-
chmod 600 /etc/ha.d/authkeys
Lastly, the final Heartbeat configuration file which is to be located in: /etc/ha.d/haresources
haproxy1 \
       IPaddr::172.25.87.180/24/eth0
Now we need to configure HAProxy, HAProxy shares the traffic web server nodes. In the below configuration, HAProxy will ’roundrobin’ the web server requests to all active web server nodes.
The configuration on both servers, identicial again! – So ensure that both servers have the following content appended to the end of /etc/haproxy/haproxy.cfg
listen     web-cluster         172.25.87.180:80
                 mode http
                 stats enable
                 stats auth admin:password # Change this to your own username and password!
                 balance roundrobin
                 option httpclose
                 option forwardfor
                 cookie JSESSIONID prefix
                 server web1 172.25.87.192:80 cookie A check
                 server web2 172.25.87.193:80 cookie B check
                 server web3 172.25.87.194:80 cookie C check
The very last step, before starting the HAProxy daemon is to enable the daemon, again, this step needs to be carried out on both servers!
nano /etc/default/haproxy
and change:
ENABLED=0
to
ENABLED=1
Fantastic, HAProxy should now start without any problems, lets try starting it (on both servers) like so:-
/etc/init.d/haproxy start
Installing the web servers
For this simple test, I’ve very quickly installed nginx on each of the web servers, you can do so by running the following command:
apt-get install nginx
Then, to test the load-balancing is working correctly later on, I’ve edited the default nginx ‘welcome’ page found in /usr/share/nginx/www/index.html and then simply added the name of the server to display on that page, later on when testing our new setup you can then easily see what server is serving the content!
The content of my index.html file looks as follows:-
<html>
<head>
<title>Welcome to nginx!</title>
</head>
<body bgcolor="white" text="black">
<center><h1>Welcome to nginx! (web1)</h1></center>
</body>
</html>
Thats great, thats all we need to do on the web servers!
Testing it out…
Now, as long as your web servers are online, you should now be able to access your webserver cluster from your web browser at: http://172.25.87.180/

Now, refresh the pages a few times, the page should then change to ‘Welcome to nginx (web2)’ and then ‘Welcome to nginx (web3)’ and then will go back to ‘Welcome to nginx (web1)’ etc. – This is known as ’roundrobin’ load-balancing.
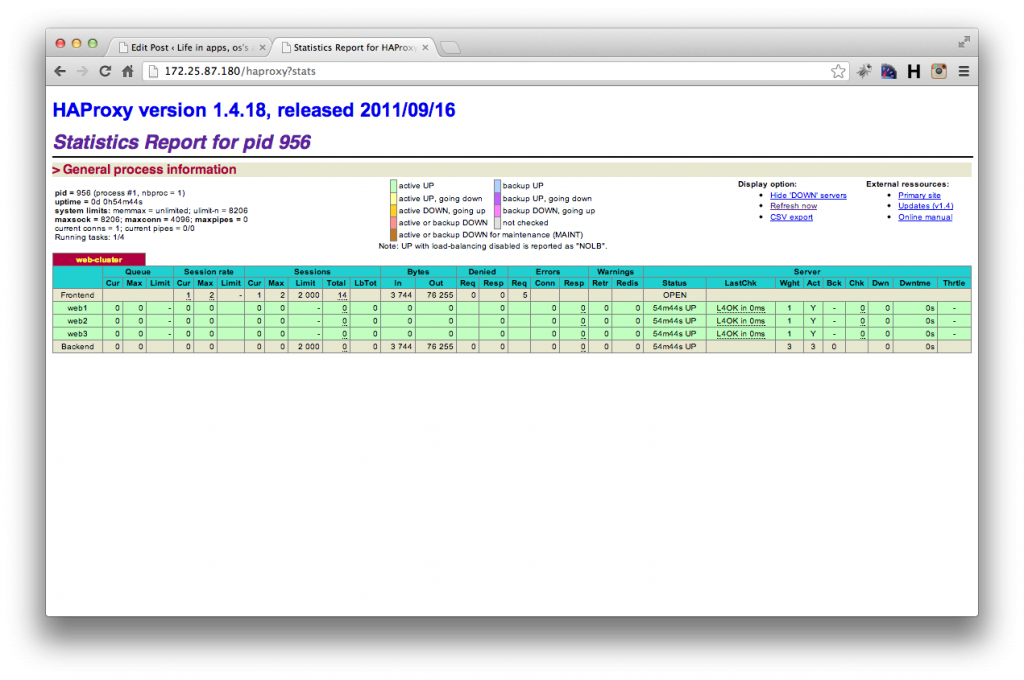
As we’ve also enabled the HAProxy stats you can also see your cluster stats (which web servers are online etc) by typing:- http://172.25.87.180/haproxy?stats, once you’ve entered the correct username and password combination you’ll be faced with a nice statistics page like so:-
Credit where credit is due, most of the information for this I found on this great webpage:- http://blog.romerojunior.com/linux/linux-building-basic-high-availability-infrastructure-for-web-servers/
2 replies on “Installing a high availability web server cluster on Ubuntu 12.04 LTS using HAProxy, HeartBeat and Nginx”
[…] Uma alternativa é utilizar ferramentas como HAProxy, HeartBeat, Watchdog e Nginx. Um tutorial para iniciar os estudos pode ser lido em blog.bobbyallen.me. […]
[…] Source: The personal blog of Bobby Allen […]