
After getting three old Dell Dimension L1000R desktop PC’s after work was going to throw them out I decided to turn one of them into a Linux server mainly for me to have sitting on the internet mainly to use for remote backups and remote access to documents and other stuff I want to keep safe and access securely over the net (SSH) and therefore decided to turn this moderatly powered Dell machine into a server that would be able to run on any internet connection I put it on (obviously would need to foward ports) but would use DynDNS for the domain name and IP Update service so regardless of if my IP address was to change (Which is likely if your ISP does not give you a static IP address or have not purchased one) so anyway, This little quick tutorial is how you can setup the DynDNS client using ddclient, Configure and ensure that it automatically checks and updates your IP address if required.
Step #1
First off if you havent already registered a DynDNS account you will need to do this by visiting the website at www.dyndns.com, They also have a how-to which is easy to follow and will let you know how you can register an account and create your Hostname. (click here for the How-to)
Step #2
Now to keep your username and password secure over the internet when the ddclient program updates your IP address we will send the username/password combination over an SSH-Tunnel (Secure Shell) so we will have to install a few packages using Ubuntu’s lovely APT tool, So at the console (as root user) enter the following command:
apt-get install ssh libio-socket-ssl-perl
Step #3
Now we install the ddclient (The program that is used to communicate with the DynDNS service and update your IP address with DynDNS if a change of IP is detected.), So again, logged on as ‘root’ issuse this command at the terminal prompt:
apt-get install ddclient
Step #4
The installation will now prompt you to answer a series of questons (if you havent already logged into your DynDNS account and created a Hostname you will need to do it now before going any further). The screens should now look as follows:

^ You will need to select ‘www.dyndns.com’ as your dynamic dns service provider as shown above.
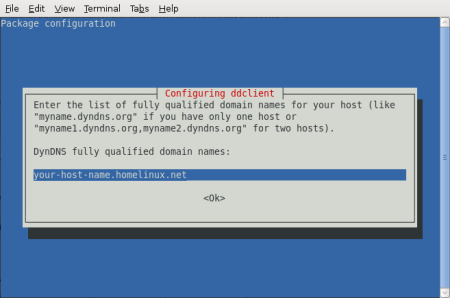
^ You now need to enter your full domain name that you registered with DynDNS.
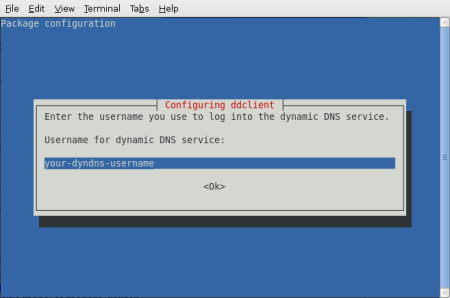
^ Obviously you need to enter your DynDNS Username as shown above otherwise anyone would be able to update your IP address and therefore hijack your domain.
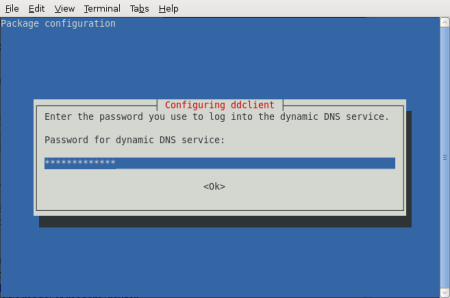
^ Enter your DynDNS account password as shown above.
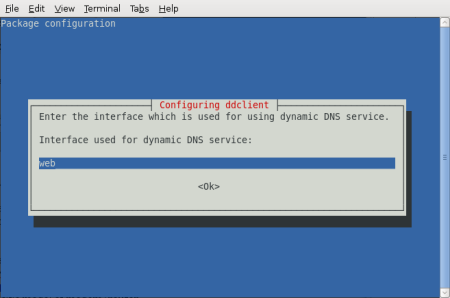
^ Finally type web as the DNS Interface to use as shown above.
Ok now basically the ddclient is now fully setup but we still have a little more work to do to ensure that our DynDNS username and password is send encrypted over SSH to the DynDNS Servers, So moving on we now need to edit the raw ddclient configuration file so as root, enter the following command at the Terminal:
vim /etc/ddclient.conf
This should now open the configuration file in VIM (A CLI text editor for Linux/UNIX) the coniguration should look something like this (the bold line is what we will be changing so pay attentsion:
 # Configuration file for ddclient generated by debconf

#

# /etc/ddclient.conf
pid=/var/run/ddclient.pid
protocol=dyndns2
use=if, if=web
server=members.dyndns.org
login=your-dyndns-username
password=âyour-dyndns-passwordâ
your-host-name.homelinux.net
Ok, So now change the use=if, if=web text to the following:
use=web, web=checkip.dyndns.com/, web-skip='IP Address'
Secondly add this to the top of the configuration file below the comment’s section (comments are prefixed with # (hashes))
 ssl=yes

daemon=300
The above two lines that you just added to the configuration file tells ddclient to connect using SSL and to check for updates every 5 minutes (300 seconds).
Now we need to check that ddclient is set to run as a daemon (System Service) so again, lets open the next configuration file by issueing this command:
vim /etc/default/ddclient
Now the configuration file itself should look like this…
# Configuration for ddclient scripts
# generated from debconf on Tue Jan 29 20:23:32 CST 2008
#
# /etc/default/ddclient
# Set to âtrueâ if ddclient should be run every time a
# new ppp connection is established. This might be useful,
# if you are using dial-on-demand
run_ipup=âfalseâ
# Set to âtrueâ if ddclient should run in daemon mode
run_daemon=âtrueâ
# Set the time interval between the updates of the dynamic DNS name in seconds.
# This option only takes effect if the ddclient runs in daemon mode.
daemon_interval=â300â³
Thats basically it, All we now need to do is to restart the ddclient daemon by entering this command at the console:
/etc/init.d/ddclient restart