
In my previous post I wrote about how to setup an SSL VPN server on Windows 2012 R2 and enable external network access to the server using OpenVPN.
This article will walk you through the process of configuring IP forwarding on our Windows server and exposing static routes to enable VPN clients to access network devices on the LAN given that Out-the-box OpenVPN will only allow the clients to access the resources on the OpenVPN server.
This article will cover the following things:
- Enable IP Forwarding on Windows Server 2012 R2 (so that our VPN traffic can route to our internal network and vice-versa)
- Add static routes to our server.ovpn configuration so the routes are advertised to the client machines so they understand how to route to our LAN network.
- Add static routes to our internal network clients (using Windows DHCP and I will also demonstrate adding them manually for servers using static IP addresses) so that LAN clients and servers can “see” the VPN clients. – What goes up must come down!!
- Use our internal DNS server for name resolution by adding some additional client configuration to the server.ovpn file to enable better hostname resolution for a more “transparent” configuration.
Lets get going…
Enable IP forwarding
To enable IP forwarding on the server we will need to use Regedit (Windows Registry Editing Tool), this change is very simple to make and although this can also be achieved by enabling Routing and Remote Access on the server there is little point given that we simply don’t need it.
On the server, open up Command Prompt and run:
regedit
Navigate to: HKEY_LOCAL_MACHINE\SYSTEM\CurrentControlSet\Services\Tcpip\Parameters
Double click the IPEnableRouter entry and set the Value data field to ‘1’
The result of which should look as follows:

You can now close Regedit!
At this point I had to restart my server as the IP Forwarding did not appear to work immediately! – I’d therefore recommend that you restart your server at this point too!
Add static routes to our server.ovpn configuration
By adding a static route for our internal network to the server.ovpn file, these static routes will be downloaded and set on the client machines when they connect to the VPN and is required to enable the client machines to understand how to route to our LAN.
In our example we will assume that our internal network subnet is: 172.25.87.0 and we will use the default OpenVPN subnet of 10.8.0.0 for the VPN clients.
To add the static route we need to edit our OpenVPN Server Configuration file; using notepad open the following file:
C:\Program Files\OpenVPN\config\server.ovpn
Now scroll down the file until you find this section:
# Push routes to the client to allow it
# to reach other private subnets behind
# the server. Remember that these
# private subnets will also need
# to know to route the OpenVPN client
# address pool (10.8.0.0/255.255.255.0)
# back to the OpenVPN server.
;push "route 192.168.10.0 255.255.255.0"
;push "route 192.168.20.0 255.255.255.0"
As you can see there is already two examples of how to add routes but instead of deleting the examples (The ‘;’ character is an comment!) we’ll add a new one below it:
push "route 172.25.87.0 255.255.255.0"
This will tell OpenVPN clients that when the computer tries to access any IP address in the 172.25.87.0 subnet that it should route through our OpenVPN server (as the default gateway for this network).
You should also find the following configuration section and uncomment (remove the ‘;’ character) the client-to-client directive as demonstrated below:
# Uncomment this directive to allow different
# clients to be able to "see" each other.
# By default, clients will only see the server.
# To force clients to only see the server, you
# will also need to appropriately firewall the
# server's TUN/TAP interface.
client-to-client
For the changes to take effect, save the file and restart the OpenVPN Service from the Control Panel > Administrative Tools > Services panel.
If all has gone well, your VPN clients should not be able to route to the 172.25.87.0 network.
Add static routes to our LAN connected computers so they can “talk” to our VPN clients
There are a number of ways in which we can advertise the route to our network devices on the LAN, for example you could add the static route on the primary gateway (eg. your router) but for simplicity I will show you how to add these static routes in via. DHCP using Microsoft DHCP services given that we are also using Microsoft DNS services it makes sense to do it this way:
Lets open up the DHCP Server MMC by navigating to:
Control Panel > Administrative Tools > DHCP
Expand your current server and expand “IPv4“, and then expand “Scope” now select “Scope Options“, if you don’t already have an option setup called:
121 Classless Static Routes
Then add a new route as per this screenshot:
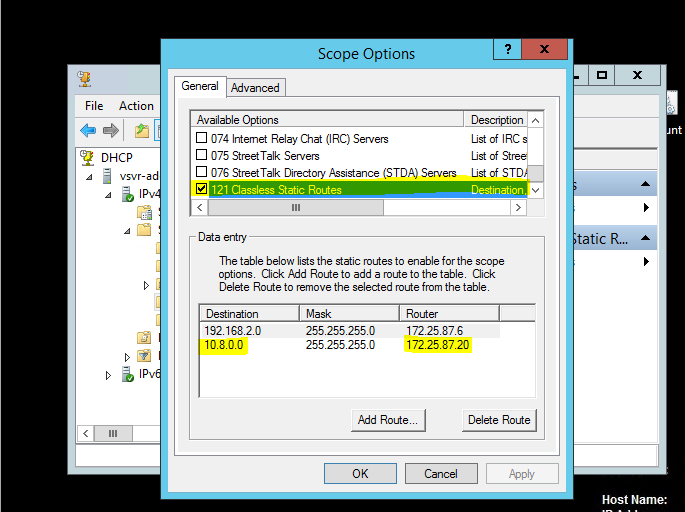
That’s it, now on your internal network machines, the next time they get a new IP address they will also obtain the static route information!
The other way in which you can add these routes (if you have servers or machines that do not get their network configuration from a DHCP server) is to add it manually using the terminal/command prompt.
On a Windows-based PC/Server the command you need to run is:
route add -p 10.8.0.0 mask 255.255.255.0 172.25.87.20
This will add a static route for the 10.8.0.0 network with a netmask of 255.255.255.0 to route via. 172.25.87.20; 172.25.87.20 is the IP address of the “gateway” and is our Windows Server 2012 R2 server which is running the OpenVPN server software as well as our DHCP and DNS server.
To test that the route has been added successfully use the following command to “print” out the routing table:
route print
Now test that the route is successfully working by using an internal network machine to “ping” a connected VPN client using it’s IP address eg. ping 10.8.0.3 (that is ping-able as most firewalls will block ICMP requests!!)
Configure VPN clients to query our internal DNS servers
By default OpenVPN is configured to use a split tunnel configuration and therefore client-side DNS settings will default to use the ISP’s DNS servers and due to this, internal server name resolution will fail to work (unless you are using a manually updated hosts file)
On my network I’m using Windows DNS services to manage DNS name resolution for all my internal servers and dynamic hostnames from DHCP leases.
Given that we have already added a static route to the internal network, we can now specify to the OpenVPN clients to use our internal DNS server, in this example my DNS server has an IP address of 172.25.87.20, we will also set the domain suffix and search suffix properties so that clients do not have to use the FQDN when attempting to locate hostnames.
Open up the server.ovpn file again as we did when we added the static routes and locate the following configuration block:
# Certain Windows-specific network settings
# can be pushed to clients, such as DNS
# or WINS server addresses. CAVEAT:
# http://openvpn.net/faq.html#dhcpcaveats
# The addresses below refer to the public
# DNS servers provided by opendns.com.
;push "dhcp-option DNS 208.67.222.222"
;push "dhcp-option DNS 208.67.220.220"
We will now add our internal DNS server (for any external address our DNS server is configured to forward requests to Google’s external DNS servers) under the above configuration block:
# Use our internal DNS server
push "dhcp-option DNS 172.25.87.20"
# Custom Domain and Search Suffix
push "dhcp-option DOMAIN mydomain.local"
push "dhcp-option SEARCH mydomain.local"
Save the file and restart the service again and reconnect all VPN clients for the changes to take effect!
For your reference, you can see my server.ovpn example that is tested as working here.
2 replies on “Enabling OpenVPN clients to access to the LAN.”
[…] Enabling OpenVPN clients to access to the LAN. […]
[…] have followed this guide to configure all the static routes and packet forwarding on both sides, but it doesn’t work […]