
In my last couple of blog posts (here and here) I demonstrated how to setup an OpenVPN server using Windows Server 2012 R2 and enable IP forwarding to enable OpenVPN client roaming access to the server network; today I will explain how to setup a Ubuntu Server 14.04 LTS based server which we will ultimately use as a site-site client router.
To give you some background of what I’m doing, I’m going to use my existing OpenVPN server setup as per my last couple of posts (here and here) but I now want to setup a Raspberry Pi2 (running Ubuntu Server 14.04 LTS) as a router given that it consumes a low amount of power and small in size. The plan is to set this up at my mums house so that when it’s connected she can access my home network and vice-versa (a site-to-site VPN) this will enable her to then access my file servers, store all her photos and ensure that they are aways backed up to the cloud (my home file storage server runs FreeNAS using the ZFS file system and automatically backs up to a cloud storage service daily).
A couple of considerations here, firstly my mum’s home router is a BT HomeHub and not something you can set static routes on (these kind of features normally only come with commercial grade routers), therefore I will instead install a DHCP server on the Raspberry Pi2 in addition to the OpenVPN client to enable the publishing of static routes to the clients on her local network, the set-up will ensure that only local network traffic bound for the server network is routed via. the Raspberry Pi2 (over the VPN) and local internet browsing traffic continues to route through the BT HomeHub (the default gateway) to maintain a fast web browsing experience!
Lets start…
So first of all, I will make the assumption that you already have a clean version of Ubuntu Server 14.04 installed on your Pi2 (or other hardware).
The next thing you should set the hostname of the server, it is important that the hostname of the server matches the SSL certificate common name that we will set up later, so for now I would recommend you set the hostname (I’ll use ovpn-router-aaa in this example, just replace with whatever you wish to use!) and update the /etc/hosts file (so that the hostname matches the 127.0.1.1 address like so:
echo "ovpn-router-aaa" > /etc/hostname
Next, update the line that starts with 127.0.1.1 (normally this will be on line #2) so that is follows with the hostname (unless it already does):
nano /etc/hosts
…and ammend like so:
127.0.1.1 ovpn-router-aaa
Now save the file and try to ping your hostname like so:
ping ovpn-router-aaa
It should resolve and respond back with 127.0.1.1 and by doing this, the sudo command will stop complaining about being unable to lookup the hostname – As well as many other benefits ofcourse! 😉
Next you should give some thought to your IP addresses that you will use, for the new remote network I will be using 10.10.0.x subnet you can ofcourse use whatever you like and I would recommend that you adjust any references to this subnet below if you choose to use a different one.
So, for clarity, 10.10.0.1 will be the static IP address that be assigned to the BT HomeHub router at my mums house, 10.10.0.2 will be the static IP address that will be assigned to the Ubuntu Server that will be running the OpenVPN client, the DHCP server and will provide the routing for our VPN LAN’s. We will keep 10.10.0.3 – 10.10.0.9 free for any static IP address requirements and will configure the DHCP server running on the Ubuntu Server to distribute a scope of 10.10.0.10 – 10.10.0.50 to internal clients.
Now that we have the IP addressing stuff out of the way, it is now time to configure the servers NIC with these details, so we will now edit the /etc/networking/interfaces file like so:
nano /etc/network/interfaces
…and adjust it so it looks similar (or the same if you are using the same IP addressing as myself):
# This file describes the network interfaces available on your system
# and how to activate them. For more information, see interfaces(5).

# The loopback network interface
auto lo
iface lo inet loopback

# The primary network interface
auto eth0
iface eth0 inet static
    address            10.10.0.2
    netmask            255.255.255.0
    gateway            10.10.0.1
    dns-nameservers    10.10.0.1
Next you will need to restart the network interfaces (or simply reboot the server) for the changes to take affect.
Create client certificates
We will need to create the SSL certificate for the OpenVPN client (router) that we are configuring, so in order to do this, logon to your Windows Server and open up the command prompt and run the following commands:
cd \
cd "C:\Program Files\OpenVPN\easy-rsa"
vars.bat
build-key.bat ovpn-router-aaa
You can accept the defaults when asked for the Country, Org unit etc. but ensure that when prompted for the Common Name and Name attributes that these match your hostname (eg. ovpn-router-aaa) and ensure that when prompted for a challenge password you skip it!!
If you would like to re-cap the process of creating the client certificates, see my original post here.
Once you have created the client certificates you now need to locate the following files in the C:\Program Files\OpenVPN\easy-rsa\keys directory and keep them for later (we will need to upload these to our Ubuntu Server later!
- ca.crt
- ovpn-router-aaa.crt
- ovpn-router-aaa.key
Enable IP forwarding
We now need to enable IP packet forwarding on our Ubuntu Server to enable the routing functionality on our server. To enable IP forwarding we need to run the following commands:
nano /etc/sysctl.conf
We need to uncomment the following line and make sure it is set to ‘1’ (and not ‘0’):
net.ipv4.ip_forward=1
Save the file and now run the following command to enable the change:
sysctl -p /etc/sysctl.conf
Great stuff! – Lets move on…
Install OpenVPN
We will now install OpenVPN and configure it:
apt-get install openvpn
We now need to configure the client VPN configuration file, to do this we will create a new configuration file:
nano /etc/openvpn/vpn.conf
We will need to populate it with the following content (replace XXX.XXX.XXX.XXX with your OpenVPN server public IP address or FQDN):
client

dev tun
proto udp
remote XXX.XXX.XXX.XXX 1194

log-append /var/log/openvpn.log

resolv-retry infinite
nobind

persist-key
persist-tun

ca ca.crt
cert client.crt
key client.key

verb 3

comp-lzo
Now upload the ca.crt, ovpn-router-aaa.crt and ovpn-router-aaa.key to the server (in the /etc/openvpn directory) and for best practice (seems to be the convention around the OpenVPN community), we will now rename both the ovpn-router-aaa.* files to simply ‘client’:-
cd /etc/openvpn
mv ovpn-router-aaa.crt client.crt
mv ovpn-router-aaa.key client.key
We will now configure OpenVPN to start automatically and connect to the VPN at boot, to do this we need to edit the following file:
nano /etc/default/openvpn
…now set (or uncomment) the AUTOSTART directive to ALL like so:
AUTOSTART="all"
Save the file!
By restarting the openvpn service the VPN configuration should now try and connect to the remote network, lets test it out:
service openvpn restart
You can check the status of this by looking at the OpenVPN logs like so:
tail /var/log/openvpn.log
Any error messages should be visible here but you should be all good!
Test ping!
If you followed my other tutorials then you will remember that the IP address for our VPN server (on the Tun interface) is: 10.8.0.1, therefore lets see if we can ping it:
ping 10.8.0.1
Assuming all went well you should now be getting a response back from the server!
Test reboot functionality…
At this point, it may be a good idea to reboot the Ubuntu Router and then login and try pinging immediately (to check that the OpenVPN service has auto-connected at reboot)
Install a DHCP server and advertise the static routes to our LAN clients.
So at this point we have our router connecting to our remote network and we have tested that we can route to the server using the 10.8.0.x subnet but now we need our local client machines (those machines on the client network) to know how to route traffic to the remote (server-side) LAN – In my situation this will be my home network!
We will therefore configure DHCP on the Ubuntu Server and advertise a static route for our clients to ensure that they don’t have to manually add the static routes their side:
# Stop OpenVPN service just for interface reasons...
service openvpn stop

# Install the DHCP server...
sudo apt-get install isc-dhcp-server
Now we will tell the DHCP service to only run on our eth0 interface (so we don’t try to advertise DHCP leases to other networks (including over VPN tunnel) by adding eth0 into the INTERFACES=”” directive:
nano /etc/default/isc-dhcp-server
So simply replace the line INTERFACES=”” with INTERFACES=”eth0″ and then save the file!
Now we will set out configuration up, edit the main DHCP service configuration file here:
nano /etc/dhcp/dhcpd.conf
And we will now set up as per our requirements, the following file contains everything that we will need, copy and paste it and tweak where required:
ddns-update-style none;
log-facility local7;

subnet 10.10.0.0 netmask 255.255.255.0 {
    # We set the BT HomeHub as the default gateway...
    option routers 10.10.0.1;
    option subnet-mask 255.255.255.0;
    option broadcast-address 10.10.0.255;
    # The domain name for the local network
    option domain-name "arads.local";
    # The name of your ActiveDirectory Domain (and other local domains)
    option domain-search "arads.local", "alln.uk";
    # To resolve computer names from local DNS, I set this to the Windows 2012 R2 Server
    option domain-name-servers 172.25.87.20;
    # Put all the static routes for your other networks here!!
    option static-routes 10.8.0.0 10.10.0.2, 172.25.87.0 10.10.0.2;
    # If you have a server running NTP, you can set it here!
    option ntp-servers 172.25.87.20;
    default-lease-time 86400;
    max-lease-time 86400;
    # The IP range that we will serve...
    range 10.10.0.10 10.10.0.50;
}
Save the file and restart the service like so:
service isc-dhcp-server restart
OpenVPN Server Configuration changes
Now we need to logon to our Windows Server and make a slight change, we need to add our new route using the “push” directive and add a new directive for a CCD (Client Configuration Directory)
On the Windows server, using Notepad (or another text editor) open up the file: C:\Program Files\OpenVPN\config\server.ovpn
Add his new “push” directive (under the ones that already exist):
push "route 10.10.0.0 255.255.255.0"
We now need to un-comment (or add) the following directives further down to enable client specific configuration:
client-config-dir ccd
Lets create the ‘ccd‘ directory now, this should be created under C:\Program Files\OpenVPN\config – Do this now!
Next up, we have to create new configuration file in the new ccd directory (C:\Program Files\OpenVPN\config\ccd), this file should be named the same as the hostname/cert common name – Therefore in my scenario, the file should be name ‘ovpn-router-aaa‘ and you MUST ensure that the file DOES NOT have a file extention eg. if you are using for example, Microsoft Notepad, this will automatically add this for you, make sure you remove it if required!
In the file we have to specify the internal route (using the iroute directive) this will force the remote LAN router (in our case, this will be the Ubuntu Router that will be located at my mums house) NOT to route the local LAN traffic over the VPN!
The contents of the file should be as follows:
# Set a static IP address for the Router's client connection (to OpenVPN)
ifconfig-push 10.8.0.10 255.255.255.0

# Set the internal IP range for this network.
iroute 10.10.0.0 255.255.255.0
Save the file and restart the OpenVPN service using the Administrative Tools > Services panel.
Given that we have just restarted the OpenVPN service you should force all your clients/other VPN routers to reconnect to ensure they get the latest configuration!
Configure IPTables
Ubuntu Server, by default comes with IPTables tables installed, we need to add two persistent rules to ensure that all routed traffic is permitted like so:
apt-get install iptables-persistent

# Add the rule to enable IP packet forwarding through the firewall...
sudo iptables -t nat -A POSTROUTING -o tun0 -j MASQUERADE
sudo iptables -t nat -A POSTROUTING -o eth0 -j MASQUERADE

# Save the current IP tables configuration so it is persistent.
sudo /etc/init.d/iptables-persistent save
sudo /etc/init.d/iptables-persistent reload
I would suggest rebooting your Ubuntu Server at this point!!
Adding the new route to the DHCP server on the server network.
We will now RDP to our Windows Server (the one that is running the OpenVPN server) and we will now add the new static route to our DHCP configuration.
Add the following static route (10.10.0.0) to your existing routes:
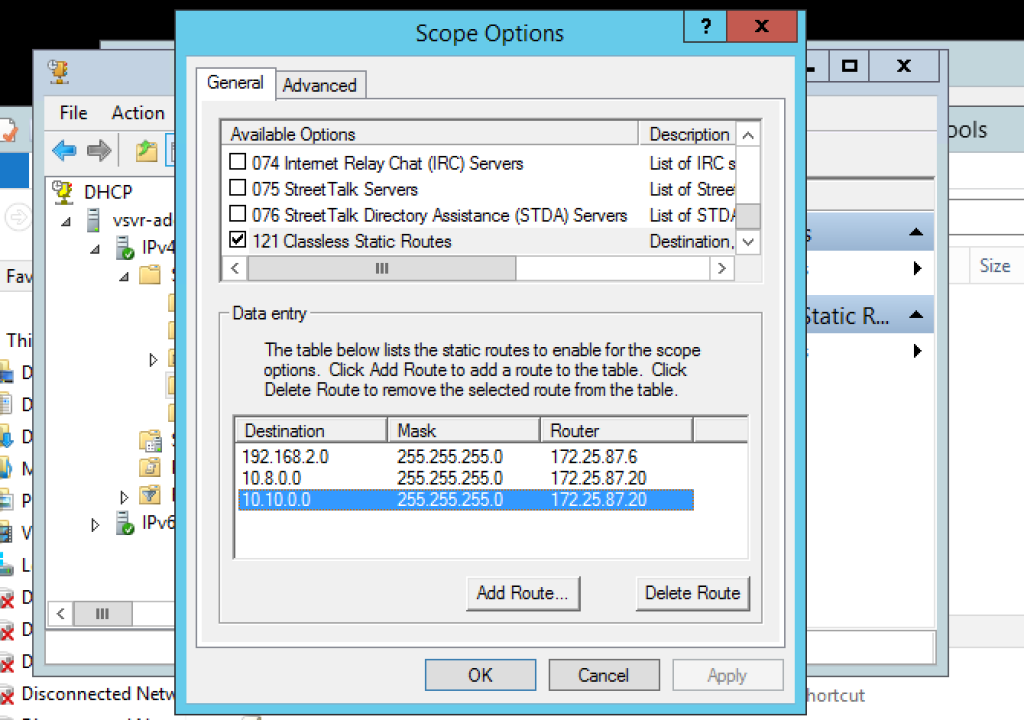
Ensuring that the router address is your Windows Server’s physical NIC address.
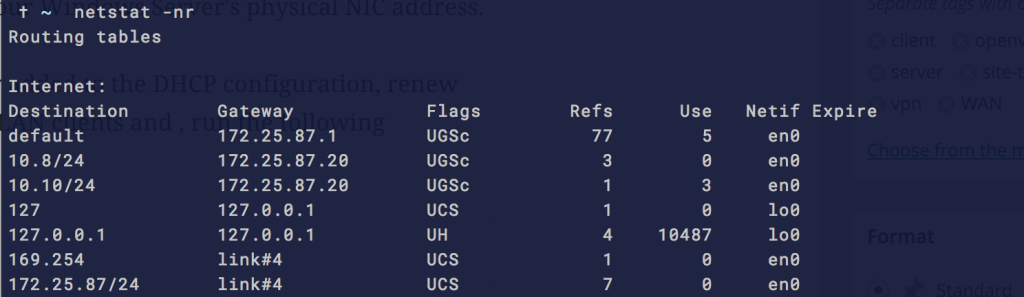
To check that it has been successfully added to the DHCP configuration, renew the IP address on one of your server LAN clients and then run the following command:
route print
Or if you are using a Mac, instead use:
netstat -nr
If using a Mac, You should now see it in the list like so:
We should now be able to ping the remote client network devices from our client machines (and our Windows server) like so:
# Ping the BT HomeHub (the client network Default Gateway)
ping 10.10.0.1

# Ping the Ubuntu Server (VPN router)
ping 10.10.0.2

# Ping out first DHCP client (assuming one is connected!)...
ping 10.10.0.10
Congratulations – You should now be all up and working!!
A couple of things to keep in mind…
- If you have any servers with manually entered static IP addresses (not distributed by DHCP) these will need the static routes added manually if you wish to have them accessible to the other subnets.